Balancing background music with dialogue can be tricky — too loud, and it distracts; too soft, and it loses impact.
That’s why Adobe Audition’s Auto Ducking feature is a game-changer. It automatically lowers your background music when someone speaks and brings it back up when they stop — no manual keyframing needed.
In this guide, you’ll learn how to use Auto Ducking to create smooth, professional mixes for podcasts, videos, and voiceovers.
1. What Is Auto Ducking?
Auto Ducking automatically adjusts audio levels in real time based on other tracks.
It’s especially useful for:
- Podcasts with background music under dialogue
- YouTube videos or tutorials with narration
- Film projects with ambient sound and voiceover
💡 Think of it as an “auto-volume assistant” that reacts to your voice and manages your music perfectly.
2. Set Up a Multitrack Session
- Open Adobe Audition.
- Go to File → New → Multitrack Session.
- Choose a sample rate of 44,100 Hz for podcasts or 48,000 Hz for video.
- Import your files:
- Place dialogue or narration on Track 1
- Place background music on Track 2
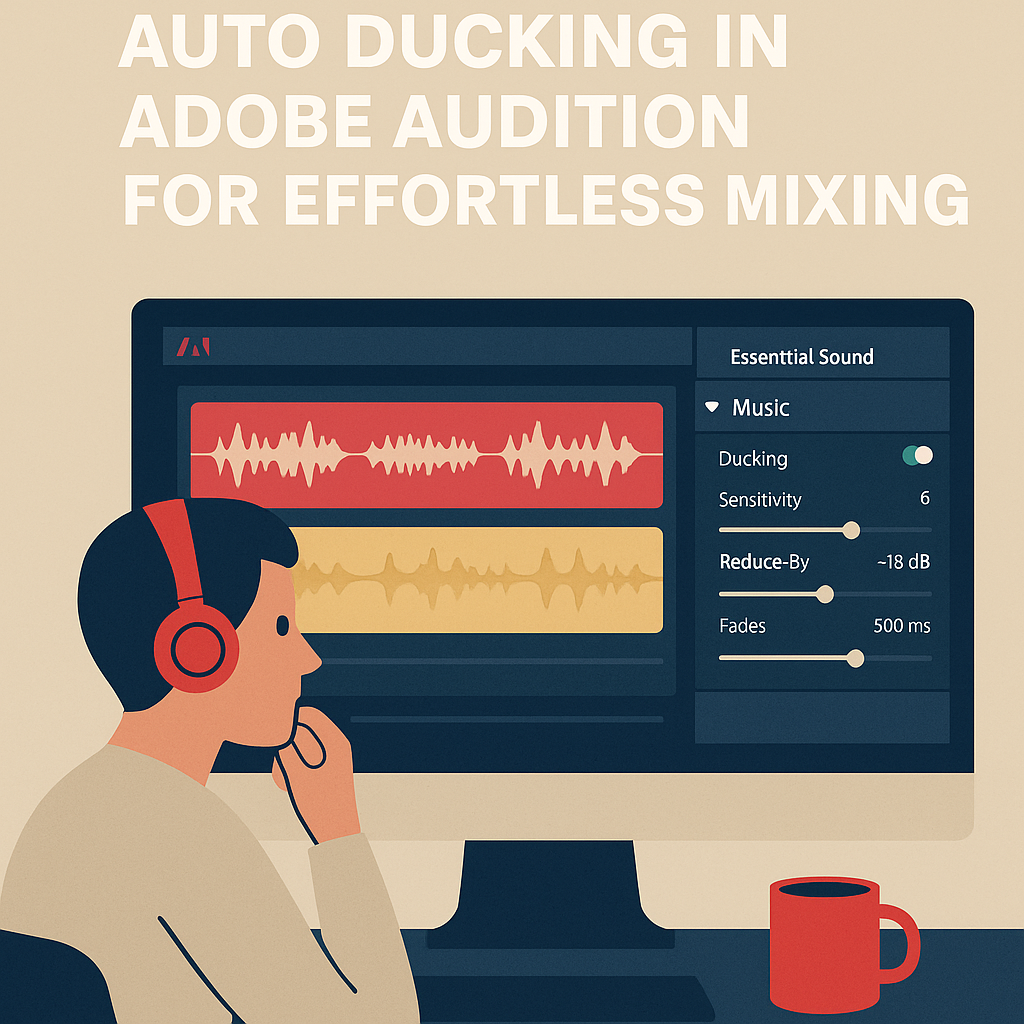
3. Open the Essential Sound Panel
Go to Window → Essential Sound to open the panel on the right.
This is where Auto Ducking lives.
4. Tag Your Clips
Adobe Audition needs to know which track is which:
- Select your voice clip and click Dialogue in the Essential Sound Panel.
- Select your music clip and click Music.
You’ll now see a set of controls appear under each type.
5. Enable Auto Ducking
With your music clip still selected:
- In the Music section, check the box for Ducking.
- Under “Duck Against,” make sure Dialogue is selected.
- Click the Generate Keyframes button.
Audition will automatically analyze your session and create keyframes that lower the music whenever dialogue is detected.
6. Adjust the Ducking Settings
Fine-tune your mix using these sliders:
| Control | Purpose | Suggested Setting |
|---|---|---|
| Sensitivity | How quickly Audition detects dialogue | 6–8 |
| Reduce By | How much to lower the music during speech | 12–18 dB |
| Fades | Controls the speed of fade-in/out | 400–600 ms |
🎧 Pro Tip: Use shorter fades (200–300 ms) for fast-paced edits like YouTube videos, and longer fades for podcasts.
7. Preview and Adjust
Play back your mix and listen carefully:
- The music should dip just enough for your voice to stand out.
- If it ducks too much, lower “Reduce By.”
- If it lags behind your speech, increase “Sensitivity.”
Once satisfied, click Apply or leave the automation active for dynamic playback.
8. Export the Final Mix
When your balance feels right:
- Go to Multitrack → Mixdown Session to New File → Entire Session.
- Export to MP3 (128 kbps) for podcasts or WAV (48 kHz) for video.
You’ll now have a clean, well-balanced audio track that sounds effortlessly mixed.
Conclusion
Auto Ducking in Adobe Audition is one of the fastest ways to achieve professional-level audio balance.
Instead of spending hours adjusting volume manually, you can let Audition intelligently handle the transitions — ensuring your dialogue always stays clear and your music perfectly supports your message.
Next up: “How to Master Your Podcast Audio in Adobe Audition.”
