If you’ve ever wanted to raise or lower volume levels at specific moments — for example, fade music under dialogue or emphasize a key phrase — volume automation with envelopes is the cleanest and most precise method in Adobe Audition. This technique lets you create smooth, dynamic mixes without destructive edits.
In this guide, you’ll learn how to use automation envelopes in Multitrack View to control volume transitions, fades, and balance with ease.
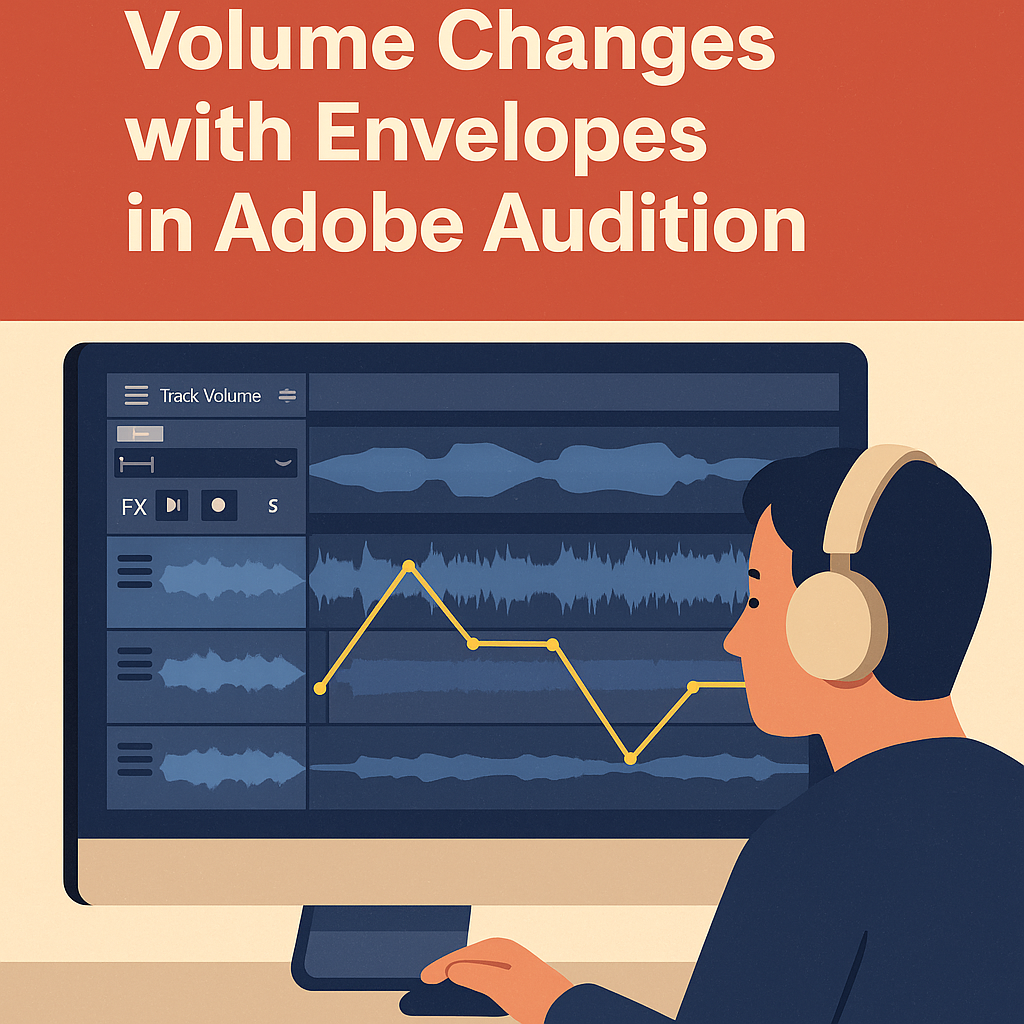
1. What Are Envelopes?
An envelope is a visual line that represents a clip or track’s volume level over time.
You can add keyframes (called “envelope points”) to this line to raise, lower, or fade volume dynamically.
🎧 Why it matters:
- Creates smooth volume transitions
- Keeps edits non-destructive
- Ideal for balancing music, dialogue, or effects in podcasts and video projects
2. Open the Multitrack View
- Go to File → New → Multitrack Session.
- Import your audio clips (e.g., voiceover, background music, sound effects).
- Click on each track header to access automation options.
💡 Pro Tip: Multitrack View is perfect for envelope automation — it keeps all layers editable and synchronized.
3. Show Volume Envelopes
- Locate the Automation Lanes in your track controls.
- Click the drop-down menu and select Track Volume.
- A yellow line (the volume envelope) appears across the waveform.
You can now adjust volume at any point on the timeline.
4. Add and Adjust Keyframes
To automate volume:
- Click directly on the yellow envelope line to create keyframes.
- Add at least two points — one for where the change begins and one for where it ends.
- Drag the line up to increase volume or down to decrease.
🎙️ Example: Fade music under dialogue — create a smooth dip during speech, then bring it back up when the host finishes talking.
💡 Tip: Hold Shift while dragging for finer control.
5. Automate Using Clip Envelopes
You can also automate at the clip level:
- Select a clip.
- Hover near the top until the Volume Line appears.
- Add and move keyframes to create fades directly on that clip.
Clip envelopes move with the audio — perfect for rearranging timelines without losing automation.
6. Automate Pan for Creative Effects
Automation isn’t limited to volume — you can automate panning too.
- In the automation drop-down, choose Pan (Left/Right).
- Add keyframes to move a sound from left to right (e.g., for stereo ambience or moving effects).
💡 Pro Tip: Keep panning subtle for natural results — extreme shifts can distract listeners on headphones.
7. Fine-Tune with the Automation Modes
Adobe Audition offers multiple automation modes in the Editor Panel Toolbar:
| Mode | Purpose |
|---|---|
| Read | Plays automation but doesn’t change it |
| Write | Records fader moves during playback |
| Touch | Records fader changes while you touch the control |
| Latch | Keeps recording automation after release until playback stops |
🎧 Workflow Tip: Use Touch Mode for gentle adjustments during live playback — ideal for podcast mixes.
8. Create Smooth Fades
For quick transitions:
- Use Fade Handles at the clip’s top corners to create instant in/out fades.
- Combine with envelope automation for precision timing.
💡 Example: Fade in music during an intro, then dip gently when the host begins speaking.
9. View and Edit Automation Curves
To make your mix sound natural:
- Right-click the envelope line → Toggle Bezier Curves.
- Drag the curve handles to create gradual, natural volume transitions.
This gives you cinematic, professional fades instead of abrupt jumps.
10. Save Time with Preset Templates
If you frequently automate the same way (e.g., podcast intros and outros):
- Save your automation as part of a Multitrack Session Template.
- Go to File → Export → Session Template.
- Name it, e.g., “Podcast Fade Automation Template.”
You can reuse it for future projects instantly.
Conclusion
Automation envelopes are one of the most powerful yet underused tools in Adobe Audition. They let you mix dynamically and precisely — controlling music, dialogue, and sound effects in perfect harmony. Once you master envelopes, you’ll spend less time micromanaging volume and more time crafting professional, balanced sound.
Next up: “How to Create Smooth Crossfades Between Clips in Adobe Audition.”
